Introduction
Nextcloud is an open-source network disk tool that allows users to build their own cloud network disk on their private server.
Nextcloud provides both server-side and client-side software. It supports desktop-level operating systems such as Windows, Linux, and macOS, as well as mobile-level operating systems such as Android and iOS. Therefore, personal users can easily use their private cloud network disk after building it.
Docker is a tool that creates containers that can virtualize the operating system layer, isolating a separate environment for running one or more software applications. It avoids dependency and runtime environment conflicts for the software and allows for easy deployment of certain software on a server.
Prerequisites
- docker and docker-compose
- Domain name (second-level domain is sufficient)
- acme.sh (generating SSL certificate)
- nginx (reverse proxy)
Preparation
Install Docker and Docker Compose
-
Debian-based systems can directly install docker using
apt:1sudo apt-get install docker-ce -
Install Docker Compose:
1sudo apt-get install docker-composeDocker Compose uses a file named
docker-compose.ymlto “synthesize” a docker container.docker-compose.ymlis the formula for synthesizing this docker container.
Prepare Domain Name
Create a second-level domain on the website where you purchased your domain name or on your domain management website, and configure domain name resolution. For specific instructions, please refer to “Building a Personal Website (Part One): Purchasing a Personal Domain Name and Configuring Dynamic Domain Name Resolution”.
For example, if you have a primary domain name jinli.cyou, you can create a second-level domain “cloud.jinli.cyou” for your personal cloud network disk. Then, bind the domain name and IP address on the Alibaba Cloud domain management platform.
Use acme.sh to Generate SSL Certificates
Many online tutorials use Let’s Encrypt to generate SSL certificates, but since I have already downloaded the acme.sh tool when building this website, I will use acme.sh to generate a certificate for “cloud.jinli.cyou”. For specific instructions, please refer to “Building a Personal Website (Part Two): Building a Personal Website Using the Hugo Framework”.
The process is as follows:
-
Find the Access key for your domain management account. You can use the previous one or obtain a new one and export the Access key as system variables
Ali_KeyandAli_Secret. -
Use the following command to generate the certificate:
1acme.sh --issue --dns dns_ali -d your.domain.com -
Use the following command to copy the certificate to your Nextcloud directory. For example, I created a folder named
certin the Nextcloud installation directory to store the certificate files:1 2 3acme.sh --install-cert -d your.domain.com \ --key-file /media/nextcloud/cert/key.pem \ --fullchain-file /media/nextcloud/cert
nginx reverse proxy configuration
Since I installed nginx when building this website, I used nginx as the reverse proxy tool for Nextcloud (although Apache is mainly used for installation instructions on the Nextcloud website).
Create a new configuration file named nextcloud.conf as the reverse proxy configuration file for the cloud drive in the nginx configuration directory, and write the following content:
server {
listen 443 ssl http2;
listen [::]:443 ssl http2;server_name cloud.jinli.cyou;
ssl_certificate /media/nextcloud/cert/cert.pem;
ssl_certificate_key /media/nextcloud/cert/key.pem;
client_max_body_size 0;
underscores_in_headers on;location ~ {
proxy_set_header Host $host;
proxy_set_header X-Real-IP $remote_addr;
proxy_set_header X-Forwarded-For $proxy_add_x_forwarded_for;
proxy_set_header X-Forwarded-Proto $scheme;
add_header Front-End-Https on;proxy_headers_hash_max_size 512;
proxy_headers_hash_bucket_size 64;proxy_buffering off;
proxy_redirect off;
proxy_max_temp_file_size 0;
proxy_pass http://127.0.0.1:7080;
}
}
Here, I used port 7080 as the service port for Nextcloud and did not limit the size of uploaded files for users. The SSL certificate is stored in the location specified in the previous step.
After the configuration is completed, restart the nginx service to make the modification effective:
|
|
Install Nextcloud
Configure docker-compose
Since we have generated SSL certificates and configured nginx above, we only need to configure two containers, nextcloud and database, in docker. Here we choose to use MariaDB as the database.
Create a docker-compose.yml file in the Nextcloud installation root directory and write the following content:
version: ‘3’
services:
db:
image: mariadb
container_name: nextcloud-mariadb
networks:
- nextcloud_network
volumes:
- ./db:/var/lib/mysql
- /etc/localtime:/etc/localtime:ro
environment:
- MYSQL_ROOT_PASSWORD=PASSWORD1
- MYSQL_PASSWORD=PASSSWORD2
- MYSQL_DATABASE=nextcloud
- MYSQL_USER=nextcloud
restart: unless-stoppedapp:
image: nextcloud:latest
container_name: nextcloud-app
networks:
- nextcloud_network
ports:
- 7080:80
depends_on:
- db
volumes:
- ./nextcloud:/var/www/html
- ./app/config:/var/www/html/config
- ./app/custom_apps:/var/www/html/custom_apps
- ./app/data:/var/www/html/data
- ./app/themes:/var/www/html/themes
- /etc/localtime:/etc/localtime:ro
environment:
- VIRTUAL_HOST=your.cloud.domain.name
restart: unless-stoppednetworks:
nextcloud_network:
Here you need to:
- Change “MYSQL_ROOT_PASSSWORD” and “MYSQL_PASSWORD” to the database password you set, or change the names of “MYSQL_DATABASE” and “MYSQL_USER”.
- Change the domain name in “VIRTUAL_HOST” to your own cloud drive domain name.
Generate containers using docker-compose
Execute the following command in the Nextcloud installation root directory to generate containers:
|
|
Install and initialize Nextcloud
After completing the above steps, you can access your cloud drive from the browser! Enter the cloud drive URL in the browser, for example, mine is https://cloud.jinli.cyou. Then you will see the following page:
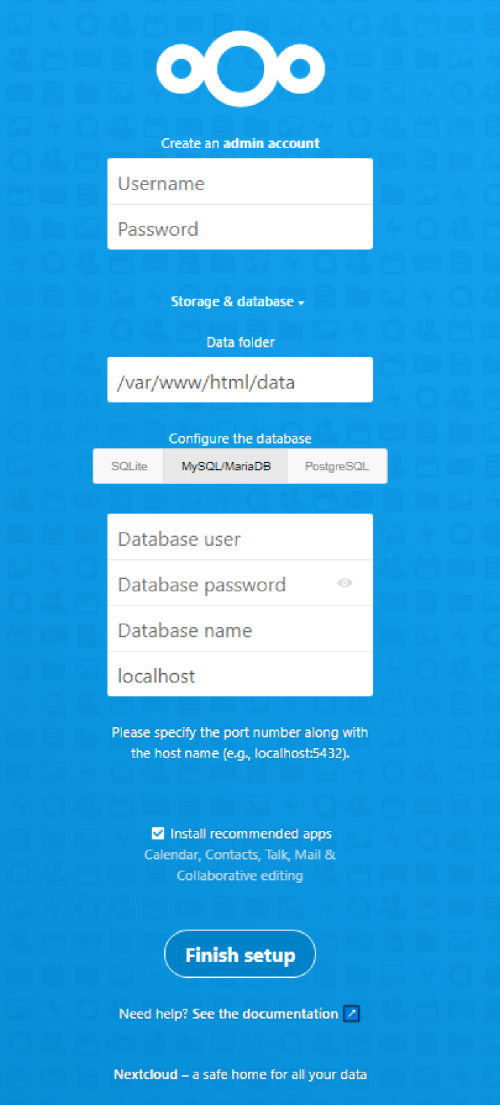
Here you need to:
- Create an administrator account and remember the username and password.
- Click “Storage & databases”, change the default database “SQLite” to “MySQL/MariaDB”, enter the user, name, and password of the database, and change the last column from “localhost” to “db”.
Finally, click “Finish Setup” to install Nextcloud, which may take several minutes. After installation, you can log in to Nextcloud with the administrator account!
Add new users and other settings
After logging into Nextcloud as an administrator, click the administrator account avatar in the upper right corner and you will see the “Users” option in the dropdown menu. Click this option to add user groups and new users.