This website uses Hugo theme “stack”. This post shows how to apply different Hugo themes, introduces the features of Hugo theme “stack” and some customization of “stack”.
Motivation
Initially when I built a personal website, I tried Hexo Framework. I used several Hexo themes, including hexo-theme-yilia, hexo-theme-yilia-plus and hexo-theme-next. I also tried a theme https://leirock.github.io/blog/, which is a theme based on hexo-theme-next and was created by a GitHub user called “leirock”. This theme was my favorate and its GitHub repo is https://github.com/leirock/blog. And it looks like this:

However, since the multi-lingual configurations on Hexo was complicated and annoying, I finally decided to give up using Hexo and turned to Hugo framework. I didn’t try too many Hugo themes, I was using hugo-theme-stack since then. I found that some useful features were missed when I was applying this theme. So I modified it a little bit.
Prerequisite
-
The domain name was configured
-
Hugo framework was installed
If these two conditions are not satisfied, please refer to the previous articles of this series:
Install Hugo Theme
- We call the directory of the website on our local server as “Website root directory”. For example, the website root directory used in this article is
~/Documents/www/website1. - We call the
themedirectory in the website root directory as “theme root directory”. For example, the theme root directory used in this article is~/Documents/www/website1/themes/hugo-theme-stack.
-
First, enter the website root directory. Then use following command to download theme stack and put it in the
themesfolder:1 2cd ~/Documents/www/website1 git clone https://github.com/CaiJimmy/hugo-theme-stack/ themes/hugo-theme-stack -
Apply the example site. There is an example site in theme stack, which is in the
exampleSitefolder in the theme root directory. Once the files inexampleSitefolder are copied to the website root directory, we can apply the example site. Do note that this process will override the existing files with the same names. If you don’t want them to be overridden, please back up them before running the following commands.Copy the files in
exampleSiteunder the stack theme root directory to the website root directory:1cp -r themes/hugo-theme-stack/exampleSite/* ./Then we need to delete the
config.tomlfile generated automatically by Hugo in the website root directory. So that to avoid the conflict between it and theconfig.yamlcopied fromexampleSitefolder.1rm config.toml -
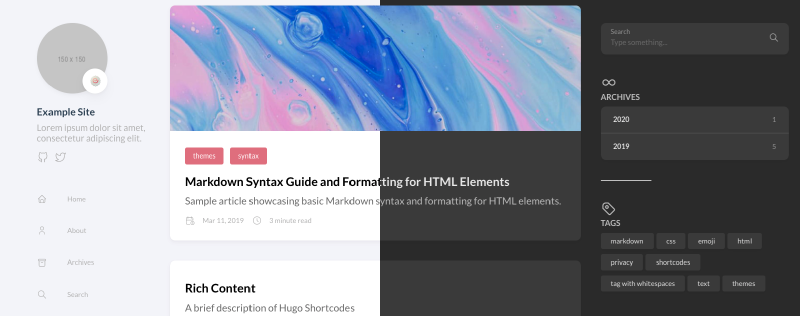
Preview the example site. Run the following command in the website root directory:
1hugo serverThen open a browser in your local server. Enter
http://localhost:1313and you will see the example site. You can refer to the cover image of this article for the actual effect of the example site. Or you can go to the example site provided by the author of theme stack https://demo.stack.jimmycai.com/.
Instruction for Basic Usage
File structure of a Hugo website
The file and directory tree of a website root directory is shown as following:
|
|
Besides, the private and public directory in the website root directory are not shown.
publicdirectory will be generated after deploying the website usinghugo -Dcommand.publicdirectory is exposed to public. All the HTML files for this webnsite pages will be generated by Hugo and be put in thepublicdirectory. DO NOT place any sensitive files, such as files that contain user’s information, in thepublicdirectory!privatedirectory can be created by the user. Here we use it for storing the SSL certificate of this website.
For detailed explaination of the directories in the website root directory, please refer to the official documents of Hugo https://gohugo.io/getting-started/directory-structure/.
Configuration directory config
Hugo supports two kinds of configurations:
.configfile in the website root directory- Creating a
configdirectory in the website root directory and put the configuration files inconfigdirectory
For the 2nd configuration method, we can put different configurations in different files, which is more logical and clear. So here we use the 2nd configuration method. The structure of the config directory for this website is shown below:
|
|
For more detailed instructions of the configurations in Hugo, please refer to the official documents https://gohugo.io/getting-started/configuration/.
Modify and Customize Theme Stack
I made two modifications on the original theme stack:
- Add new user-defined icons, so that the left sidebar can show the icon of Douban, Zhihu, Gitee, etc.
- Add a multi-language switcher button at the bottom of the life sidebar (main page), or at the top of the right sidebar (article page).
User-defined icons
Since the original theme stack only supports several limited social icons, including GitHub, Twitter, RSS etc. While for the Chinese users, Weibo, Zhihu etc. are more generally used, but the icons are not supported. So I decided to replace the SVG icons in the original theme stack, and introduce more icons including Weibo, Zhihu, etc.
When I used Hexo framework, I found some social icons in theme yilia and theme yilia-plus. So I introduced the icons from them to theme stack. Here is how I did it.
-
Obtain the fonts from Hexo theme yilia-plus. Go to the GitHub repo of theme yilia-plus https://github.com/JoeyBling/hexo-theme-yilia-plus. Download the
fontsfolder under the directorysource-src/css. And copy this folder to thestaticdirectory in the website root directory. -
Modify the menu style in the theme stack. Find the file
assets/scss/partial/menu.scssin the theme root directory of theme stack, which is the style file of the left sidabar menu in theme stack. Replace the code block which defines the.social-menuat the bottom of the file with following code:1 2 3 4 5 6 7 8 9 10 11 12 13 14 15 16 17 18 19 20 21 22 23 24 25 26 27 28 29 30 31 32 33 34 35 36 37 38 39 40 41 42 43 44 45 46 47 48 49 50 51 52 53 54 55 56 57 58 59 60 61 62 63 64 65 66 67 68 69 70 71 72 73 74 75 76 77 78 79 80 81 82 83 84 85 86 87 88 89 90 91 92 93 94 95 96 97 98 99 100 101 102 103 104 105 106 107 108 109 110 111 112 113 114 115 116 117 118 119 120 121 122 123 124 125 126 127 128 129 130 131 132 133 134 135 136 137 138 139 140 141 142 143 144 145 146 147 148 149 150 151 152 153.social-menu { list-style: none; padding: 0%; display: flex; flex-direction: row; gap: 0px; a { border-radius:50%; display:-moz-inline-stack; display:inline-block; vertical-align:middle; *vertical-align:auto; zoom:1; *display:inline; margin:0 8px 15px 8px; transition:0.3s; text-align: center; color: #fff; opacity: 0.7; width: 28px; height: 28px; line-height: 26px; &:hover { opacity:1 } } a.weibo { background: #aaaaff; border:1px solid #aaaaff; &:hover { border:1px solid #aaaaff; } } a.segmentfault { background: #009a61; border:1px solid #009a61; &:hover { border:1px solid #009a61; } } a.rss { background: #ef7522; border:1px solid #ef7522; &:hover { border:1px solid #cf5d0f; } } a.github { background: #afb6ca; border:1px solid #afb6ca; &:hover { border:1px solid #909ab6; } } a.gitee { background: #c8171e; border:1px solid #c8171e; &:hover { border:1px solid #c8171e; } } a.facebook { background: #3b5998; border:1px solid #3b5998; &:hover { border:1px solid #2d4373; } } a.google { background: #4086f4; border:1px solid #4086f4; &:hover { border:1px solid #4086f4; } } a.twitter { background: #55cff8; border:1px solid #55cff8; &:hover { border:1px solid #24c1f6; } } a.linkedin { background: #005a87; border:1px solid #005a87; &:hover { border:1px solid #006b98; } } a.acfun { background: #fd4c5d; border:1px solid #fd4c5d; &:hover { border:1px solid #fd4c5d; } } a.bilibili { background: #e15280; border:1px solid #e15280; &:hover { border:1px solid #e15280; } } a.zhihu { background: #0078d8; border:1px solid #0078d8; &:hover { border:1px solid #0078d8; } } a.douban { background: #06c611; border:1px solid #06c611; &:hover { border:1px solid #06c611; } } a.mail { background: #005a87; border:1px solid #005a87; &:hover { border:1px solid #006b98; } } a.jianshu { background: #ff5722; border:1px solid #ff5722; &:hover { border:1px solid #ff5722; } } a.weixin { background: #4caf50; border:1px solid #4caf50; &:hover { border:1px solid #4caf50; } } a.qq { background: #34baad; border:1px solid #34baad; &:hover { border:1px solid #34baad; } } a.psn { background: #086ef6; border:1px solid #086ef6; &:hover { border:1px solid #086ef6; } } } -
Add index for the fonts. The index can be treated as the user-defined customizable style file. Go to the GitHub repo of theme yilia-plus https://github.com/JoeyBling/hexo-theme-yilia-plus. Download the
source-src/css/fonts.scssfile, and copy all the contents into theassets/scss/custom.scssfile in stack’s theme root directory. -
open the file
layouts/partials/sidebar/left.htmlunder stack’s theme root directory. Find the row that containing{{- with .Site.Menus.social -}}. Replace all the contents between this line and its corresponding line{{- end -}}with following contents:1 2 3 4 5 6 7 8 9 10 11 12 13<ol class="social-menu"> {{ range . }} <li> <a class="{{ .Identifier }}" href="{{ .URL }}" {{ with .Name }}title="{{ . }}"{{ end }} {{ if eq (default true .Params.newTab) true }}target="_blank"{{ end }} > <i class="icon-{{ .Params.Icon }}"></i> </a> </li> {{ end }} </ol> -
If you need the social icons to display below your avatar at the left sidebar, you need to add the corresponding options in the configuration file. For example, if you want the GitHub and the email to be displayed, you can add following contents in the configuration file
config/_default/menu.en.yamlandconfig/_default/menu.zh-cn.yaml:1 2 3 4 5 6 7 8 9 10 11 12social: - identifier: github name: GitHub url: https://github.com/jin-li/ params: icon: github - identifier: mail name: Email url: "mailto:[email protected]" params: icon: mailFor the effect, please refer to the left sidebar of this website.
Language switch button (Multi-lingual switcher)
Although Hugo framework natively supports multi-lingual, the theme stack doesn’t provide a language switch button. I read some discussions on the Hugo forum and then modified the code in theme stack. So that the language switch button is added to the theme.
There are mainly two functions of the button:
- Adding a language switch button below the “Dark Mode” button at the left sidebar of the main page, for the language switching of the whole website.
- When the current website language is Chinese, the website language will switch to English after clicking the button.
- When the current website language is English, the website language will switch to Chinese after clicking the button.
- Adding a language switch button on the top of the “Contents” at the right sidebar of the article page, for the language switching of a single page.
- When there is a corresponding bi-lingual page of the current page, the button will display
- When there is no corresponding bi-lingual page of the current page, the button will not display
For the effect of this language switch button, please refer to this website. Here is how I did it.
-
Download a SVG icon for the translation button. And place it in the
assets/iconsdirectory under stack’s theme root directory. -
Find the
assets/scss/partials/sidebar.scssfile in stack’s theme root directory, which is the style file that defines the style of the sidebar of the website. Add following contents at the end of the file:1 2 3 4 5 6 7 8 9 10 11 12 13 14 15 16 17 18 19 20.language-select{ align-self: stretch; color: var(--body-text-color); align-items: center; } .language-select #selected{ font-weight: 500; display: flex; margin-top: 0px; margin-bottom: 0px; } .language-select #to-select{ font-weight: 100; display: flex; a { margin-left: 60px; } margin-top: 0px; margin-bottom: 0px; } -
Find the
assets/scss/partials/layout/article.scssfile in stack’s theme root directory. Add following contents at the end of the file:1 2 3 4 5 6 7 8 9.widget--translation { background-color: var(--card-background); border-radius: var(--card-border-radius); box-shadow: var(--shadow-l1); display: flex; flex-direction: column; color: var(--card-text-color-main); overflow: hidden; } -
Find the
layouts/partials/sidebar/left.htmlfile in stack’s theme root directory. Add following contents at 3rd line from the bottom of the file:1 2 3 4 5 6 7 8 9 10 11 12 13 14 15 16 17 18{{ if .Site.IsMultiLingual }} {{ $siteLanguages := .Site.Languages}} {{ $pageLang := .Page.Lang}} {{ range .Page.AllTranslations }} {{ $translation := .}} {{ range $siteLanguages }} {{ if eq $translation.Lang .Lang }} {{ $selected := false }} {{ if eq $pageLang .Lang}} {{ else }} <div class="language-select"> <li id="selected">{{ partial "helper/icon" "trans" }}<a href="{{ $translation.RelPermalink }}"><span>{{ .LanguageName }}</span></a></li> </div> {{ end }} {{ end }} {{ end }} {{ end }} {{ end }} -
Open the
layouts/partials/sidebar/left.htmlfile in stack’s theme root directory. Find the last code block that defines the right sidebar in the file and replace it with following contents:1 2 3 4 5 6 7 8 9 10 11 12 13 14 15 16 17 18{{ if .Site.IsMultiLingual }} {{ $siteLanguages := .Site.Languages}} {{ $pageLang := .Page.Lang}} {{ range .Page.AllTranslations }} {{ $translation := .}} {{ range $siteLanguages }} {{ if eq $translation.Lang .Lang }} {{ $selected := false }} {{ if eq $pageLang .Lang}} {{ else }} <div class="language-select"> <li id="selected">{{ partial "helper/icon" "trans" }}<a href="{{ $translation.RelPermalink }}"><span>{{ .LanguageName }}</span></a></li> </div> {{ end }} {{ end }} {{ end }} {{ end }} {{ end }} -
Add the language configuration file
languages.yamlin the configuration directoryconfig/_defaultin the website root directory. Add following contents:1 2 3 4 5 6 7en: languageName: "English" languageNameShort: "en" zh-cn: languageName: "简体中文" languageNameShort: "zh"
Finally, name the articles for the two different languages in the post folder as index.zh-cn.md and index.en.md. Then when you deploy the website with Hugo, the bi-lingual pages will be generated automatically and the language switch button will show automatically.