
Motivation
I’ve previously downloaded some eBooks, all of which are stored on the cloud drive. However, every time I want to read them on different devices, I need to download them first (even though they can be previewed on the cloud drive, I still find it better to download them and use a dedicated e-reader for a better experience). Moreover, with a growing number of eBooks, managing them on the cloud drive becomes quite chaotic. Recently, I came across the tool called “calibre-web,” which allows you to set up your own eBook library. I feel that the results are quite promising.
Prerequisites
- docker and docker-compose
- Domain name (second-level domain is sufficient)
- acme.sh (generating SSL certificate)
- nginx (reverse proxy)
Preparation
Install Docker and Docker Compose
-
Debian-based systems can directly install docker using
apt:1sudo apt-get install docker-ce -
Install Docker Compose:
1sudo apt-get install docker-composeDocker Compose uses a file named
docker-compose.ymlto “synthesize” a docker container.docker-compose.ymlis the formula for synthesizing this docker container.
Prepare Domain Name
Create a second-level domain on the website where you purchased your domain name or on your domain management website, and configure domain name resolution. For specific instructions, please refer to “Building a Personal Website (Part One): Purchasing a Personal Domain Name and Configuring Dynamic Domain Name Resolution”.
For example, if you have a primary domain name jinli.cyou, you can create a second-level domain “book.jinli.cyou” for your personal cloud network disk. Then, bind the domain name and IP address on the Alibaba Cloud domain management platform.
Use acme.sh to Generate SSL Certificates
Many online tutorials use Let’s Encrypt to generate SSL certificates, but since I have already downloaded the acme.sh tool when building this website, I will use acme.sh to generate a certificate for “cloud.jinli.cyou”. For specific instructions, please refer to “Building a Personal Website (Part Two): Building a Personal Website Using the Hugo Framework”.
The process is as follows:
-
Find the Access key for your domain management account. You can use the previous one or obtain a new one and export the Access key as system variables
Ali_KeyandAli_Secret. -
Use the following command to generate the certificate:
1acme.sh --issue --dns dns_ali -d your.domain.com -
Use the following command to copy the certificate to your Nextcloud directory. For example, I created a folder named
certin the Nextcloud installation directory to store the certificate files:1 2 3acme.sh --install-cert -d your.domain.com \ --key-file /media/calibre/cert/key.pem \ --fullchain-file /media/calibre/cert
nginx reverse proxy configuration
Since I installed nginx when building this website, I used nginx as the reverse proxy tool for Nextcloud (although Apache is mainly used for installation instructions on the Nextcloud website).
Create a new configuration file named calibre.conf as the reverse proxy configuration file for the cloud drive in the nginx configuration directory, and write the following content:
server{
listen 80;
server_name book.jinli.cyou;
return 301 https://book.jinli.cyou$request_uri;
}server{
listen 443 ssl;
ssl_certificate /media/lijin/book/certs/cert.pem;
ssl_certificate_key /media/lijin/book/certs/key.pem;
server_name book.jinli.cyou;
location / {
proxy_redirect off;
proxy_pass http://book.jinli.cyou;
proxy_set_header Host $http_host;
proxy_set_header X-Real-IP $remote_addr;
proxy_set_header X-Forwarded-For $proxy_add_x_forwarded_for;
proxy_set_header X-Forwarded-Proto $scheme;
client_max_body_size 1000m;
}
}
Here, I used port 8080 as the service port for calibre-web. The SSL certificate is stored in the location specified in the previous step.
After the configuration is completed, restart the nginx service to make the modification effective:
|
|
Install calibre-web
Here we use docker-compose to install calibre-web, please refer to
https://hub.docker.com/r/linuxserver/calibre-web for details.
Initialization and Settings
After installing calibre-web, we can enter the website through the browser.
The url is http://0.0.0.0:8080. If nginx is set up, we can also use the
domain name http://book.jinli.cyou.
The default account name and passcode for the administrator is admin and
admin123. We can do the initial settings after logging in.
-
First we need to download an empty database file
metadata.dband move it to thelibraryfolder of the installation directory of calibre-web, such as/media/calibre-web/library. -
Then choose
/booksas the database path in calibre-web. Note that the directory/booksin docker is actually the directory/media/calibre-web/libraryon the server. Here calibre-web may still show error message because of the file access permission problem: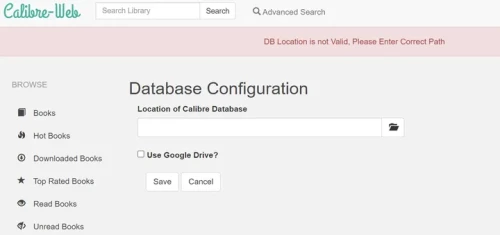 .
. -
To change the read/write permission, we need to enter the docker environment. The commands are
1 2 3 4docker exec -it calibre_web /bin/bash chmod 777 books cd books chmod 766 metadata.db -
After that we can do some other settings, such as server’s port, SSL certificate, etc.
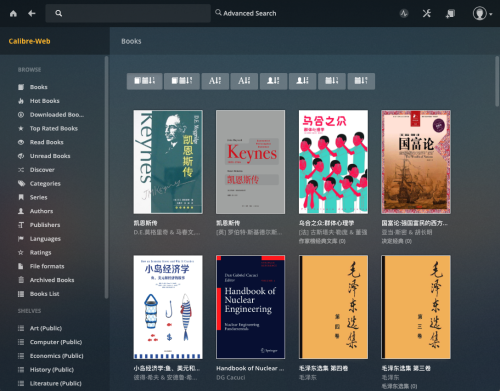
Add eBook
After setting up all initial configurations, we can add eBooks to the library. And we can create different shelves for different categories of books.
 .
.