
Background
In the first article of this series “Building a Private Mail Server using mailcow and Docker”, we built a private email server with mailcow and docker on our own computer or server. Since many operators will block port 25, causing emails to not be sent from the server, we used email relay as an alternative.
Recently, I found that my email could not be sent to the outside world again. After some testing, I found that AT&T’s email relay service was not working, and it seemed that their email system had a problem. I couldn’t even log into the att.net email I registered with them. Every time I logged in, it would always redirect to the AT&T page, and after half a day of loading, it would pop up an error page. I can’t help but spit out, as a well-known network operator, the website can be so bad, this is also a great wonder.
After many attempts, I decided to give up AT&T’s email relay service and use SendGrid email relay service instead. Here are some of the problems and solutions I encountered.
Prerequisites
- A private email server has been built using mailcow and docker (if not, please refer to “Building a Private Mail Server using mailcow and Docker”)
SendGrid Settings
Register a SendGrid Account
Register an account on the SendGrid website. In addition to the general information on the website, SendGrid also requires you to fill in company information, which can be filled in at will. Finally, you need to set up two-step verification using your mobile phone.
I chose the free version, which allows you to send up to 100 emails per day, which is enough for me.
Generate an API Key
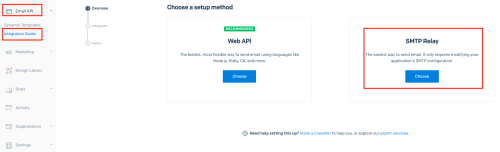
After registering, log in to the SendGrid management interface, click on the left menu bar Email API, select Integration Guide, then select SMTP Relay, and click Get Started,
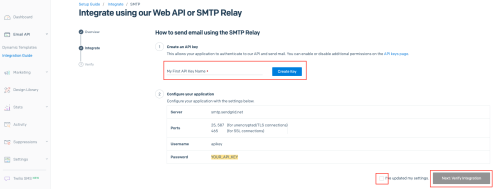
Then fill in the name of the API Key, click Create API Key, and finally check I've updated my settings., and click Next: Verify Integration.
Email Relay
The settings for email relay can be found in the previous article “Building a Private Mail Server using mailcow and Docker”, so I won’t go into them here.
One thing to note is that if you use SendGrid’s email relay service in other network applications, you need to set Relayhost to smtp.sendgrid.net:587, not smtp.mail.your_domain_name, the username is “apikey”, and the password is the API Key generated in the previous step.
Email Blocking Issues
Reasons for being blocked
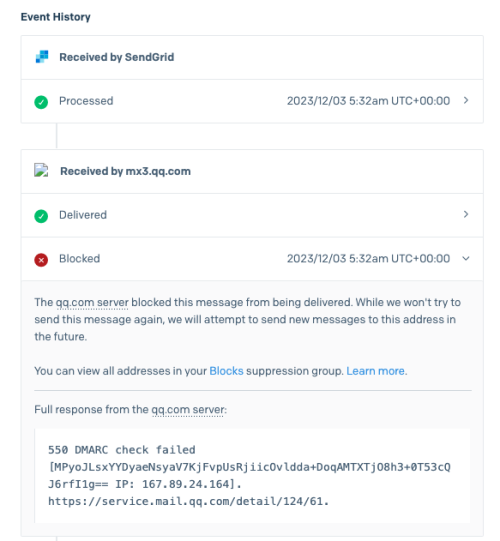
When I used SendGrid’s email relay service in one of my network applications, I found that I didn’t receive the email after waiting for a long time. Then I checked the recent activity records in the SendGrid management interface:

Click on the undelivered record, and you can see that the reason the email was blocked is 550 DMARC check failed:
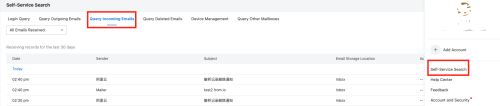
The blocked email can be viewed in the QQ mailbox. Just click on your own avatar in the upper right corner, select Self-service query, and then click on the Receive mail query section, and you can see the blocked email:
After searching online, I found that the reason for this problem is that I used SendGrid’s email relay service to send the email, but the actual sender of the email is my self-built email server, that is, the actual sender’s domain name and the nominal sender’s domain name are inconsistent. When the receiving mail server queries the DMARC record of the sender, it finds that it is inconsistent, and it is likely to refuse to receive the email.
In fact, this can also be seen when receiving emails. Click on the details of the sender, and you can see that the actual sender’s domain name is sendgrid.net, while the nominal sender’s domain name is jinli.io:

Solution
The solution to the above problem is to authenticate your domain name in the SendGrid management system. Click on your username in the upper left corner, select Setup Guide, and then complete the second step Authenticate your sending domain. SendGrid will ask you to add 3 CNAME records to your domain’s DNS server. After adding them, click verify.
After verification, you can send an email from your email to test it. This time, SendGrid will use your domain name to generate a sender address, and then use this user to send the email. In this way, the actual sender’s domain name and the nominal sender’s domain name are consistent, and can pass the DMARC check of the receiving server.