Background
There are many popular web development languages, such as Java, PHP, Python, Ruby, etc. I know Python best, so I want to use Python to develop web applications. There are many web frameworks in Python, such as Django, Flask, Tornado, etc. These frameworks have their own characteristics. Among them, Flask is a lightweight web framework, so I choose to start learning web development with Flask framework.
In this series of articles, I will start from scratch and introduce how to use the Flask framework to develop web applications step by step. This article will introduce how to use the Flask framework to develop a simple web application, including URL parsing and template rendering. This series of articles includes:
- Develop a simple web application using the Flask framework: URL routing, template rendering (this article)
- Use PostgreSQL database: create PostgreSQL database, use SQLAlchemy to operate database (see “Learn Web Development with Python (2): Use PostgreSQL and SQLAlchemy”
- Data receiving and data requesting: form, get data from third-party web API (see “Learn Web Development with Python (3): Use Input and API”
- Deploy web applications using Docker: docker-compose, Nginx, Gunicorn (see “Learn Web Development with Python (4): Deploy Website with Docker, Gunicorn and Nginx”
Introduction to Flask
Flask is a lightweight web framework. Its core is the WSGI toolkit Werkzeug and the template engine Jinja. The core of the Flask framework is the WSGI toolkit Werkzeug, which is a WSGI toolkit that can be used to handle HTTP requests and responses, as well as other tasks related to web applications. The template engine Jinja is a modern and elegant template engine that can be used to generate HTML pages.
The first simple web application
We need to create a Flask environment and then write a simple web application.
-
Create a directory for learning Flask development, such as
learn_flask, and then enter the directory:1 2mkdir learn_flask cd learn_flask -
Create a Python virtual environment to install the Flask framework and other dependencies:
1 2 3python3 -m venv env # Create a Python virtual environment source env/bin/activate # Activate the Python virtual environment pip install flask # Install the Flask framework -
Create a Python file to write the Flask application, such as
app.py:1 2 3 4 5 6 7 8 9 10from flask import Flask app = Flask(__name__) @app.route('/') def index(): return 'Hello, World!' if __name__ == "__main__": app.run()The above code creates a Flask application. When the root URL is accessed,
Hello, World!will be returned. Let’s analyze this code:from flask import Flask: Import the Flask frameworkapp = Flask(__name__): Create a Flask application.__name__is the name of the current module. If the current module is the main module, the value of__name__is__main__, otherwise the value of__name__is the name of the current module.@app.route('/'): Register a URL with theapp.route()decorator. Here the root URL,/, is registered.route()is a routing function. When a user accesses a URL, the routing function will call the corresponding Python function according to the URL request.def index():: Define a Python function to handle the request of the root URL.return 'Hello, World!': When a user accesses the root URL, theindex()function will be called, which will returnHello, World!.if __name__ == "__main__":: If the current module is the main module, executeapp.run()to start the Flask application.
-
Run the Flask application:
1python app.pyThe Flask application runs on port 5000 by default, so you can access
http://localhost:5000/in your browser to seeHello, World!: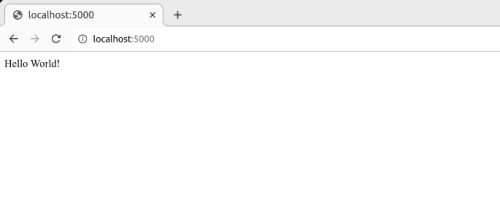
So far, we have created a simple Flask application. But now our application can only return a string, which is obviously not enough. In actual applications, we often need to return an HTML page, which requires the use of the template engine Jinja.
Use template
In the following example, we use this application to display some actual information, such as the weather in a city. We need to create an HTML page to display the weather information, then pass the weather information to the HTML page, and finally return the HTML page to the user.
Template file
- Create a
templatesdirectory under thelearn_flaskdirectory, and then create aweather.htmlfile under thetemplatesdirectory.
The content of the weather.html file is as follows:
|
|
- Create a
staticdirectory under thelearn_flaskdirectory, and then create astyle.cssfile under thestaticdirectory.
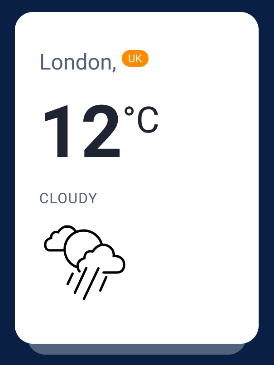
The style of the card that displays the weather information comes from https://webdesign.tutsplus.com/build-a-simple-weather-app-with-vanilla-javascript–cms-33893t, as shown below:
Pass parameters to the template
In the weather.html file, we are ready to receive a cities_data variable, and then display the weather information in the city. The cities_data variable is a dictionary. The key of the dictionary is the city name, and the value of the dictionary is a list. The elements in the list are dictionaries. The dictionary contains weather information.
|
|
Run the application
Run the application again:
|
|
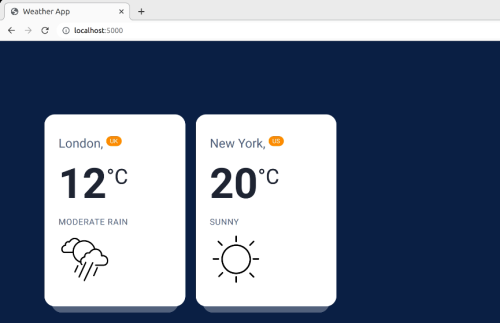
Access http://localhost:5000/ in the browser, and you can see that our website displays the weather information of two cities in two cards: