Introduction
This is the third article in this series, which mainly introduces how to use the input box to get user input, and how to use the API to get information on the Internet.
Prerequisites
- Already know how to develop a simple web application using the Flask framework (see “Learn Web Development with Python (1): Use Flask Framework”)
- Already installed PostgreSQL database and know how to use SQLAlchemy to operate the database (see “Learn Web Development with Python (2): Use PostgreSQL and SQLAlchemy”)
Get User Input
Add Input Box
First, we can use the <input> tag in the HTML page to create an input box. For example, we can add a form in templates/index.html to let users enter a city:
|
|
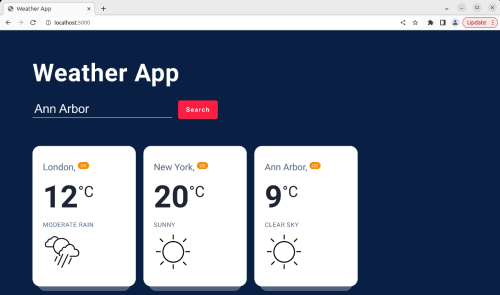
The style of the input box comes from the style.css file. This style file comes from https://webdesign.tutsplus.com/build-a-simple-weather-app-with-vanilla-javascript–cms-33893t, and the effect of the input box is as follows:

Get User Input
When the user enters the city name in the input box and clicks the “Search” button or presses the Enter key, the user’s input will be passed to the name defined in the <input> tag. We can add a POST request route in app.py to process user input. Since we have already added a route for the / path before, we only need to add a POST request for the / path:
|
|
Here we use request.form.get('city') to get the city name entered by the user and assign it to the variable city_name.
Get Weather Information Using API
OpenWeather API
OpenWeather is a website that provides weather information. After the user registers an account, the API provided by OpenWeather can be used to obtain weather information. We can register an account at https://openweathermap.org/, and then get the API Key on the https://home.openweathermap.org/api_keys page. Here we use the free version of the API Key, which can send up to 60 requests per minute and up to 1000 requests per day. The free version is enough for me.
Get Weather Information Using API
In the previous step, we used the OpenWeather API to get weather information, but this information is returned in JSON format. In Python, we can use a dictionary to access the data in JSON and store it in the database. As for the weather information in JSON, you can check https://openweathermap.org/current#current_JSON
|
|
Note:
-
The
API_KEYhere is the API Key we obtained on the OpenWeather website, and it needs to be assigned to the variableAPI_KEY. -
The city name obtained earlier may contain spaces, but the OpenWeather API does not support spaces. Spaces in the OpenWeather API are replaced by
+. Therefore, we need to replace the spaces in the city name with+and convert the city name to lowercase. For example,New Yorkwill be converted tonew+york. We can use the following regular expression to implement this function:1re.sub(r"\s+", '+', str(city_name).lower())
Process the Weather Information Obtained
In the previous step, we used the OpenWeather API to get weather information, but this information is returned in JSON format. In Python, we can use a dictionary to access the data in JSON and store it in the database. As for the weather information in JSON, you can check https://openweathermap.org/current#current_JSON
|
|
Other parts are the same as the previous code, get the weather information you want to display from the database, and then pass it to the template. The effect is as follows:
Display the Latest Weather Information
Finally, we add a slightly more complex database operation, such as displaying the latest weather information. We can add a piece of code in app.py to select the latest 4 weather information in the database, and then display them on the page:
|
|
Note that we used a subquery of SQLAlchemy here, so we need to import from sqlalchemy.sql import func, and_. Finally, when we run the entire application, we first create the database. If the database already exists, it will not be created:
|
|
Here we also need to import related modules from sqlalchemy.exc import ProgrammingError.